|
Lab
5.4.6.3: Neotrace & traceroute - Overview
Estimated time: 15 min.
Objectives:
- Use the shareware program NeoTrace
to verify the network path from source router to destination
router with a graphical display.
- Verify that the network-layer
between source, destination and each router along the way is
working properly. Retrieve information to evaluate the end-to-end
path reliability.
- Determine delays at each point over
the path and whether the host can be reached.
Background:
In this lab you will use the shareware
utility NeoTrace to determine the path that data travels
through an Internetwork. In semester 2 you completed a lab using the
Cisco IOS traceroute
command. NeoTrace uses graphics to depict the results of the
traceroute command. Additionally, NeoTrace displays the "Whois"
information for each router, by looking up the domain name owner and
labeling this information for each router on the data path.
The traceroute command uses ICMP
packets and the error message generated by routers when the packet
exceeds its Time To Live (TTL). When you initiate
the traceroute command to a target host the router sends an ICMP
echo-request packet with the TTL set to one (1). The first router in
the path to the target host receives the ICMP echo-request packet and
sets the TTL to zero (0). The first router then sends an ICMP
Time-exceeded message back to the source. The source router then sends
an ICMP echo-request packet with the TTL set to two (2). The first
router receives the ICMP echo-request and sets the TTL to one (1) and
sends it to the next router in the path to the target host. The second
router receives the ICMP echo-request and sets the TTL to zero (0)
then sends an ICMP Time-exceeded message back to the source. The
source then sends an ICMP echo-request with a TTL set to 3. This cycle
continues until an ICMP echo-reply is received from the target host or
until a ICMP destination-unreachable message is received. This allows
you to determine the last router to be reached in the path to the
target host. This is a troubleshooting technique called fault
isolation.
Tools / Preparation:
Prior to starting the lab you will
need a PC workstation with Internet access and NeoTrace
installed. You will be able to download an evaluation version of
NeoTrace. Please review the license provided with NeoTrace to ensure
that you are abiding by the rules of its shareware use. The location
of the NeoTrace program can be found below in Web Site Resources.
Resources Required:
- PC with monitor, keyboard, mouse, and power cords etc.
- Windows operating system (Win 95, 98, NT or 2000) installed on
PC
- PC with NeoTrace program installed
and connected to the lab routers
- PC with NeoTrace program installed and access to the Internet
Web Resources:
Routing
basics
General
information on routers
2500
series routers
1600
series routers
Terms
and acronyms
IP
routing protocol IOS command summary
NeoTrace
Step 1 - Run the
NeoTrace program.
Start the NeoTrace program by
clicking on the Windows Start button, then Programs. Click the
NeoTrace program group and then click the NeoTrace icon. If NeoTrace
needs to be installed, download it from the web site listed above.
If this is the first time the program
has been run, you will need to fill in the blanks on the Home
Location screen. This allows the program to look up the latitude and
longitude for your location. Click the "Try NeoTrace"
button to continue.
Step 2 - Enter the
address of an Internet resource to trace to.
In the address field, type www.cisco.com
and press enter. This address of the site you are tracing to could
be any IP address or computer that is accessible from your location,
either on the Internet or on your private LAN/WAN.
You will notice that as the process
of tracing takes place, a series of dots and line segments are
displayed. Once the traceroute command is completed, the display
shows a map with the approximate locations of the routers between
your location and Cisco's web site.
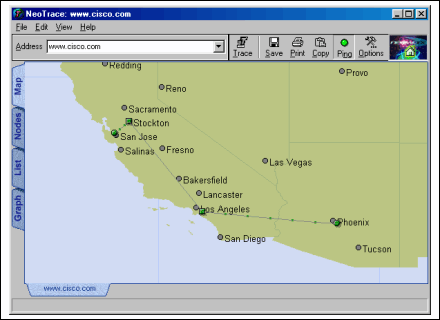
Place the mouse pointer near the
green dot near San Jose, California. Clicking the left mouse button
will zoom in, and clicking the right mouse button will zoom out.
Zoom in until you see the green circular dot with only one line
segment connecting to it. Place the mouse pointer on this dot.
1. What information is displayed?
(answers may vary)

Step 3 -
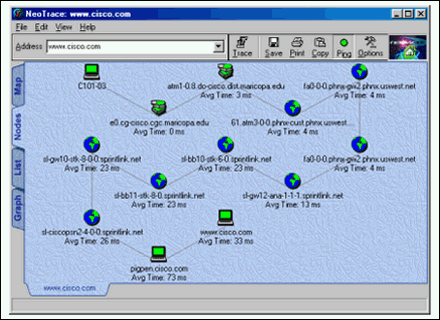
Display information on the nodes.
Click on the Nodes tab on the
left-hand side of the screen. A block diagram of the path taken to
reach Cisco's web site is displayed. You will note that periodically
the line segments between each node, or router, turn green. NeoTrace
is running the traceroute command again to check the path to your
destination, since this path may change. You will notice that the
average time (expressed in milliseconds) may change each time the
traceroute command is executed. The DNS name of each node is also
displayed.
Step 4 -
Display List information.
Click on the List tab on the
left-hand side of the screen. NeoTrace displays the results of the
traceroute command in a manner very similar to that of the Cisco IOS
traceroute command. You will note that periodically an arrow shows
up on the far left hand side of the list. NeoTrace is running the
traceroute command again to check the path to your destination,
since this path may change.

Step 5 -
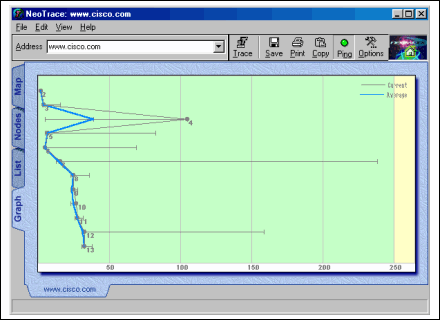
Display graph information.
Click on the Graph tab on the
left-hand side of the screen. NeoTrace displays the results of the
traceroute command as a line graph. This graph shows the current
time as a gray line, and the average time as a blue line. The
vertical access represents each node or router in the path to your
destination. Placing the mouse pointer over any of these nodes
displays the "Whois" information found for that particular
router. The horizontal access represents the time in milliseconds.
|