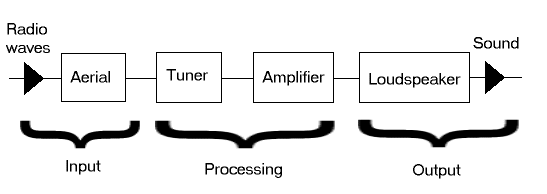
All circuits can be designed as a system.
eg. a radio receiver
The processing can the be further subdivided:
Each block can then be designed in isolation, and the blocks coupled together. We need to know the input & output properties of each block, but no details of how they work.
NB. Each block also needs a power supply input, but this is not normally shown on the diagram.
2. The resistor
A resistor has a resistance, which is measured in ohms. If you haven't got the symbol font installed, the following character will not display correctly - W . This is the symbol for Ohms.
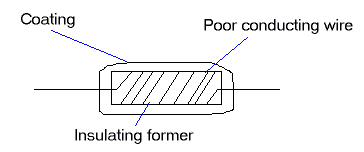
- For a higher resistance, we use a longer or thinner wire. This is quite an accurate method.
- They are temperature-stable.
- They can take a large power (gets hot) without failing.
- But they are expensive.
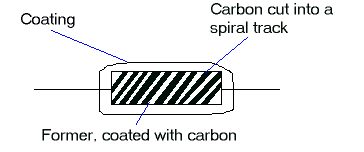
- Higher resistance - thinner carbon or narrower tracks increases the resistance.
Resistors are made in large batches, and very cheaply. This means that the resistance value obtained is rarely exactly right. This variation is known as the production spread. The accuracy of a resistor is given to ± a percentage. The ± means that it is within + or - that amount. The accuracy is known as its tolerance.
Black 0 Brown 1 Red 2 Orange 3 Yellow 4 Green 5 Blue 6 Violet 7 Grey 8 White 9

Band 1 = First digit of resistance
Band 2 = Second digit of resistance
Band 3 = Number of following zeros
Band 4 = Tolerance
Tolerances
No band = ± 20 %
Silver = ± 10 %
Gold = ± 5 %
R = ohms
K = thousands of ohms
M = millions of ohmsThe position of the letter determines the decimal point.
1800 = 1K8
120 = 120RTolerances are shown by using postfixes:
J = ± 5 %
K = ± 10 %
M = ± 20%So:
56000 ± 10 % = 56K0K
6800000 ± 5 % = 6M8J
Voltage = Current x Resistance
V = I x R
Volts = amps x ohms
Volts = milliamps x kilo ohmsNB. 1mA = 0.001 A
1 Kilo ohm = 1000 ohms
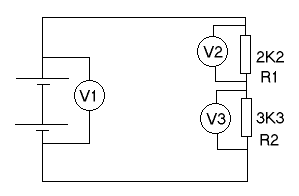
R1 R2 V1 (V) V2 (V) V3 (V) VT (V2+V3) 2K2 3K3 15.12 6.50 8.60 15.10 4K7 1K2 15.12 12.08 3.04 15.12 270R 150R 15.12 9.25 5.84 15.09 39K 69K 15.12 5.46 9.61 15.07 From this experiment, we can conclude:
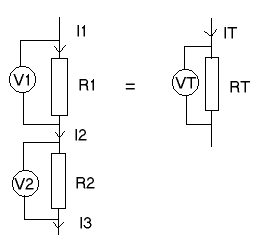
- The currents are all equal ( IT = I1 = I2 = I3 )
- The voltages (Potential differences) add together ( VT = V1 + V2 )
- The resistances add together ( RT = R1 + R2)
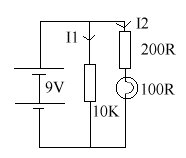
The 2 circuits on parallel each have 9V across them.
I1 = V / R = 9 / 10 = 0.9 mA
I2 = V / R = 9 / 0.3 = 30 mA
So the total current from this battery is 30.9 mA. Note that the resistance for the second half of the circuit = 300R = 0K3 , because 200 + 100 =300 .

